How to Make Maple Syrup in New Hampshire
Making maple syrup is a great way to spend time with the family. In New Hampshire about 90,000 gallons of Maple sap is collected every year. There are instructions below on making your own Maple syrup at home.
How is Maple Syrup Made?
Maple Syrup is made by collecting sap from Maple trees and boiling the sap down until you have Maple syrup. Maple sap from the tree is about 98% water and 2% sugar. Finished Maple syrup is 33% water and 67% sugar.
What Time of Year Can You Get Sap From a Maple Tree?
Maple syrup making in New Hampshire usually lasts for about 4-6 weeks and starts around the middle to the end of February and can last until mid April depending on the temperatures and weather. Cold nights that fall below freezing and warm days make the Maple sap flow the best. Windy days slow the flow of maple sap. Maple sap runs out of any holes or scrapes in the tree bark this time of year as a result of the frozen sap inside the Maple tree thawing and building up pressure in the tree. This pressure is what forces the sap out of the holes in the Maple tree.
How Much Maple Sap Does it Take to Make Maple Syrup?
It takes approximately 40-45 gallons of Maple sap to make just one gallon of Maple syrup. This can vary from different types of Maple trees. This can also vary depending on how you tap the Maple tree, the temperature outside and the time of season. During the “Sugar Run” Maple sap can run fast. So be sure to check your buckets often.
What Kind of Maple Trees Can You Tap To Get Maple Sap?
It is best to use Sugar Maple and Red Maple trees to collect sap. The sap from these trees has a higher sugar content and will produce more Maple syrup per gallon of Maple sap.
Maple Syrup Making Instructions:
To make Maple Syrup at home, you will need to get a few items. The items below are for the backyarder, If you decide to do this professionally, you should get better equipped.
- Taps (these can usually be found at feed/farm supply stores or online)
- Buckets (you can buy the real maple syrup collecting buckets from a farm supply store, online or you can even use a 5 gallon pail). If you use a pail you will need to make a cover for each pail. Make sure buckets are clean but do not use soap to clean them as it will change the taste of your Maple syrup, be sure they are well rinsed and never used for hazardous chemicals.
- A candy thermometer (found at cooking stores or craft supply stores)
- Large pots/pans to boil sap in. If you’re boiling a lot of Maple sap, it should be done outside and by using a larger set up like an empty 55 gallon metal drum for a fire pit with a large pan on top.
- Cheesecloth (coffee filters if you have nothing else)
- Containers to put your Maple syrup in when done.
How to Tap a Maple Tree:
Maple trees should be a minimum of 8″ in diameter. Smaller trees work, but it’s usually not worth the trouble. Holes should be drilled about 4-5 feet from the ground. Drill the hole for the tap (normally 1/2″ diameter holes but be sure to check your taps). Holes are normally drilled about 2″ deep into the Maple tree, but again, be sure to check the depth of the tap. Place the tap in the Maple tree, gently bang it with a hammer if needed. The tap should be tight in the tree. You should already see Maple sap slowly dripping from the tap. Place the hook that came with the tap onto the tap and hang the bucket from the hook. It is best to keep the top of the bucket covered to prevent rain, tree bark or other objects from getting into the sap. As an alternative to the normal maple syrup collecting buckets, you can use an idea we came up with as shown below.
This is a simple and much less expensive solution than the traditional metal buckets. We used Tractor Supply buckets ($2.99/each, plus the lids for $1.99/each. The used 3/4″ ID clear tubing at $1.39/foot. You will need about 10″ of tubing per bucket. If you use this method, be sure to use the metal taps as the plastic maple syrup taps won’t hold the weight of 5 gallons of sap and will break, or you can buy more tubing and place the buckets on the ground or on blocks and extend the tubing from the Maple tree. We drilled 3/4″ holes in the plastic lids, this will make the seal between the clear tubing and the lids very tight and will keep out and debris, rain or snow from entering the sap in the bucket. For a cheaper solution, buy 5/16″ tubing and the plastic spouts and T’s from a farming supply store or maple sugar house that sells sugaring supplies. Some retail stores like Tractor Supply, Agway and Blue Seal Feeds may also carry these items. This type of set up is shown below.
Storing Maple Sap:
It is best not to store Maple sap for very long. Once the bucket is full, you should begin the boiling process. Storing Maple sap will make the sap spoil.
How to Boil Maple Sap Into Sugar:
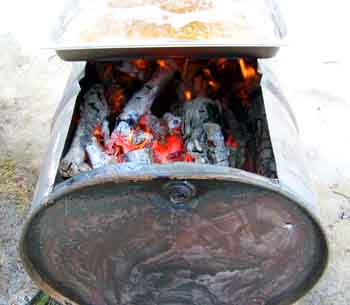
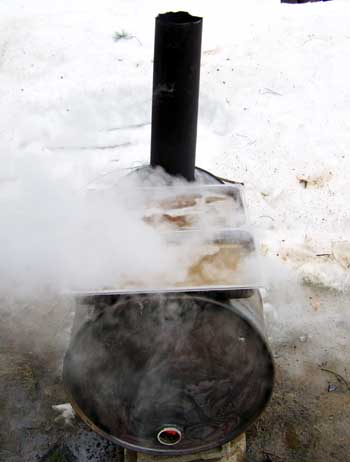
Boiling Maple sap and turning it into Maple syrup is a slow process. The goal is to boil out most of the water, leaving the Maple syrup. If you plan on boiling down sap in the house, there are a few things to remember. First, boiling Maple sap produces lots of steam that will coat your walls, ceiling, windows, cabinets, and everything else nearby with moisture from the boiling Maple sap. There is also a little bit of sugar evaporating as well. So not only will the humidity and sweet smell fill the air and your wallpaper peel off, but it will also attract ants a few weeks later…. lots of ants! So you will need to ventilate the area well and wash down what does get coated in moisture or you will be buying ant traps by the truckload. It is best to boil the Maple sap outside. A cheap solution for boiling Maple sap outside is to use a 55 Gallon metal drum that was used for food products like juices, drinks or cooking oils. Cost was $12.00.
We used a regular 55 gallon drum (used for food products) with a permanent lid. We flipped the drum on it’s side and cut one large hole. Then we used 2 shallow 18″ steam table pans. We made sure we cut the hole just big enough to fit the 2 pans into. Be sure not to cut the hole too deep, you want the bottom of the pans (not the lip) resting on the metal drum. As you can see in the photo, we cut it very shallow. Then, we used the hole as an air source for the fire and feed the fire from the top. this requires removing the hot pans occasionally to load in more wood. Use extreme caution, the drum gets very hot!
When boiling Maple sap, don’t let the sap boil all the way down. You want to keep the boiling pot of sap topped off. You will also want to skim off the foam from the top of the boiling Maple sap.
How to “Finish” Maple Syrup:
The finishing process of Maple syrup can be a little tricky. Maple syrup is finished when it is boiling at 7.5 degrees Fahrenheit over the temperature that water boils at for that day in your area. To find the temperature of boiling water for your area and daily conditions, boil a small pot of water on your stove top. Most commonly water boils at 212 degrees Fahrenheit. Different altitudes have different boiling points. Using 212 degrees Fahrenheit as an example, the Maple syrup would be done when it is boiling at 219 degrees… But again, be sure to check as it is important you get it right. If it’s not right the Maple syrup will go bad and all your efforts are lost! In the photo be sure to note the fizz-like bubbles which are an indication the syrup is almost done boiling.
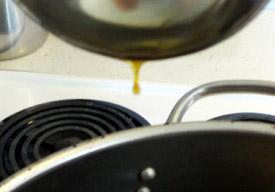
Once the Maple syrup gets close to being finished, watch the Maple syrup very closely as it can boil over fast and make a huge (very huge) mess and can ignite if it boils onto a hot stove! You will notice the bubbles get smaller and more frequent, almost like fizz from a soft drink, but a lot more bubbles. Once it looks like it is about to boil over, cut the heat back and boil a little longer (depending on how much syrup you have. Usually another 15 minutes for a half gallon of syrup. At this point start to test the syrup by using a metal spoon and scooping a little syrup out of the pot. Let it slowly trickle back into the pot while you watch the syrup drip off the spoon. The last few drops will look gooey and hang off the spoon (instead of like a drip of water) if the syrup is done. It will also taste very sweet like Maple syrup. These are all signs that your Maple syrup is either done or almost done.
Remember, the Maple syrup is done boiling when the temperature reaches 7 degrees Fahrenheit over the temperature that water boils at in your area.
Filtering the Maple Syrup:
Now that the Maple syrup is done, you will want to get out all the objects that are floating around in the pot. You can either strain the Maple syrup through a cheesecloth or coffee filter or you can let the Maple syrup cool down and settle. Most of the objects that were floating around will sink to the bottom as will the Maple Sugar sediment (Aka ‘Maple Sand” or “Sugar Sand”). Once it all settles, carefully pour off the “Good” Maple syrup, leaving the junk and sugar sand in the bottom in the pot. For the clearest Maple syrup, let the syrup cool and settle and discard the cloudy syrup at the bottom. You will still want to strain the syrup to get out any remaining debris.
Storing Maple Syrup:
The best way to store Maple syrup is to put it in the freezer (Maple syrup won’t freeze if it’s finished correctly, if it does freeze, it needs to be boiled down more). Be sure to check it occasionally.
You can also bottle it or can it. If you decide to bottle it or can it you will want to pour the syrup in the containers at about 180-190 degrees Fahrenheit and seal them well to prevent it from spoiling.
Sorry, no records were found. Please adjust your search criteria and try again.
Sorry, unable to load the Maps API.
Loudon
New Hampshire
United States


